Attaching a new thread to a short one during book quires sewing.
I understand that this topic maybe not a knowledge target for binders and conservators professionals who normally knows by heart how to do attaching a new thread to the short one during the sewing process and we do it thousands of times on our daily binding and sewing work.
So! what features of this knot do you think it should carry?
Features!! what a strange word for such a very basic and regular process for bookbinder and book conservators as well, but think carefully now!
mmmm yes! it should be:


I understand that this topic maybe not a knowledge target for binders and conservators professionals who normally knows by heart how to do attaching a new thread to the short one during the sewing process and we do it thousands of times on our daily binding and sewing work.
Features!! what a strange word for such a very basic and regular process for bookbinder and book conservators as well, but think carefully now!
mmmm yes! it should be:
- Strong, which means that when we continue sewing and pull the new threat it should be strongly attached and knot to the small (old) one.
- Even if you will attach the new thread from inside the quires or outside it (from the spine depend on your technique) you still DO NOT want to have a large solid knot that will cause a large hole when you trying to take it to throw to the inside of the sections (in case of you prefer this technique). and also if it is a large knot it will make a bad appearance to your final sewing quality and maybe the quires themselves.
- What if you have only a very short end thread? in a case of accidentally cut off the threads for example, and you are not happy to reverse the sewing for the last quire to get a long thread end to make you easily able to knot it with the new one.
 |
| Book Sewing |
So now you understand that your new thread should be attached to the short one with 3 basic features
- strong knot.
- small knot.
- easily attached to a short end.
performing a weaver's knot will give you all those features and here is a step-by-step picture tutorial teaching you how to do this knot.
note: I am using here 2 thread colors to make it easy for this tutorial to distinguishes the process
 |
| Short thread (A) White & new thread (B) blue |
I will point to the short thread (the thread that is in your quire) with the White(A) thread and the new one (which you want to knot with the short one) with the Blue(B) thread in the tutorial pictures.
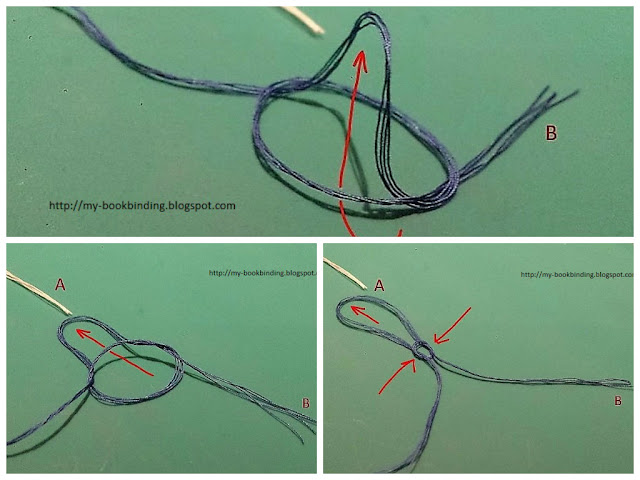
step 1:
Loop the new thread (B)


The longer end of the thread (B) is brought up throw the loop

 Place over the short end (A) of the old thread inside the loop, the encircling loop must not be tightened.

Step 3:

Pull up the long end from the middle of the loop then pull together the longer and the shorter ends of thread (B) until it makes a sort of hanging knot.

Step 2:
 Place over the short end (A) of the old thread inside the loop, the encircling loop must not be tightened.
thread (B) in an opposite direction.
Step 3:
Now the tricky part and you should be sure that you did it as I explain or as the photo is shown below, otherwise, your knot will fail to be strongly attached to the old one. >>>
The new thread (B) is tightened the short end (A) throw the encircling loop which tightens behind it as shown in pic(8)
|
 |
| pic(8) |
Note: In all previous steps, only the new thread (B) ends (the shorter one and the longer) pulled.
NOW you tight the knot pulling both threads the short one (A) and the new one (B) from both long sides to completely knot them,

Both short ends (A) & (B) are cut quite close to the knot, if you do this knot outside the quires (from the spin direction) carefully take this knot through the inside of the section as sewing is continued.

This tutorial blog is for those who like to print and keep a copy in their reference library, but for those who prefer to watch a tutorial video, here is one that I have made for you.
Happy Sewing ;)
--------------------------------------------------------------------------------------------------------------------
Sorry English is not my first language but sharing experience is a global language
Comments
Post a Comment